Creating an SVG logo
See Adobe Illustrator: Tips and Tricks for similar articles.
When creating a logo for a modern website it’s a good idea to use Adobe Illustrator or another program that can create and manipulate vector art to generate an SVG file rather than a photo editing app like Adobe Photoshop that is used to edit and manipulate pixels. The reason to use SVG for a logo and other assets is that SVGs can scale to many different sizes without losing quality and can be manipulated by JavaScript and CSS. In this post I will go over the steps to create a vector logo in Adobe Illustrator and convert it to SVG to be used on your website and lastly how to modify it via code to change size and color.
Step 1 – Open Adobe Illustrator and create new project
To create a SVG file we will need to use a program that can create and manipulate vector art. The most popular program for doing so is Adobe Illustrator. Adobe Illustrator is available as an individual program subscription from Adobe or as part of the Adobe Creative Cloud subscription. Open Illustrator and create a new project. For simplicity, set the art board to 1000px by 500px.
Step 2 – Create logo with text tool & Resize art board to fit logo
For this example we will be creating a text-only logo. Select the Type Tool and draw an area on the art board for your logo. Increase the font size until it reaches the desired width and height and fills in as much of the art board as possible.

Next we need to resize the art board so that it is just a little bigger than the logo. There are two ways to do this:
- Object > Artboards > Fit to Artboard Bounds
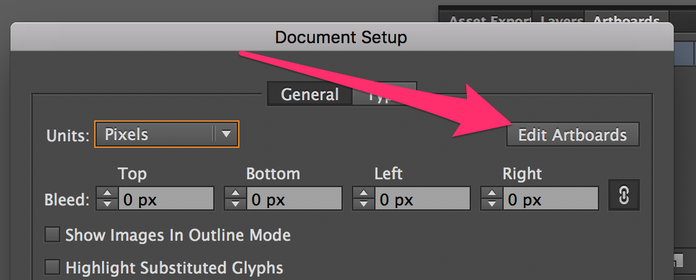
- Document Setup > Edit Artboards > Drag to size
I personally like to use a combination of the two. The Edit Artboard feature lets you drag the artboart to size it or set it with exact dimensions.
The next step is to create an outline of your logo. To do this, with your logo highlighted go to Type > Create Outlines.

After this is complete combine each shape by navigating to Window > Pathfinder and click the combine shapes button.

Next we need to save as an SVG. Click Save As and select SVG. You can keep all of the default setting and save.
Step 3 – Optimize generated SVG code
The code generated by Adobe illustrator needs to be optimized. If you open up the SVG in a text editor it looks something like this:
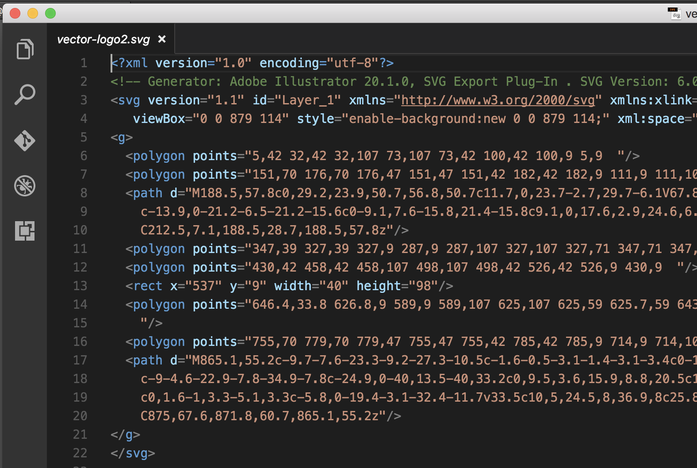
We can optimize and clean up the SVG generated with a 3rd party tool called SVGO-GUI, which you can download here. After downloading SVGO-GUI and installing it, open it. Simply find your saved SVG and drag it onto the drag and drop area. This tool will clean up all unnecessary elements in the SVG code that can be safely removed or converted without affecting the SVG rendering result. When opened with a code editor, your final SVG should look something like this:

Step 4 – Adding SVG Logo to your website
Create an empty HTML page and include a snippet of code at the top inside of our HTML body tag, or included it on an existing HTML page. What we are doing is creating an SVG element that will be the main container for our new logo.
<!doctype html>
<html>
<head>
<meta charset="UTF-8">
<title>index.html</title>
</head>
<body>

<!-- SVG Library -->
<svg xmlns="http://www.w3.org/2000/svg" style="display:none">

</svg>

</body>
</html>
Inside of that tag lets add the code for our logo. Open the generated logo SVG with a text editor and copy all the code and paste the code in our <svg> tag. Replace the copied <svg with <symbol and remove the xmlns="http://www.w3.org/2000/svg". Lastly lets give our symbol an id. For this lesson, we will call it “logo”. You should end up with something that looks like this:
<!doctype html>
<html>
  <head>
  <meta charset="UTF-8">
  <title>index.html</title>
  </head>
  <body>

  <!-- SVG Library -->
  <svg xmlns="http://www.w3.org/2000/svg" style="display:none">
    <!-- Logo -->
    <symbol id="logo" viewBox="0 0 879 114"><path d="M5 42h27v65h41v-65h27v-33h-95zM151 70h25v-23h-25v-5h31v-33h-71v98h72v-31h-32zM188.5 57.8c0 29.2 23.9 50.7 56.8 50.7 11.7 0 23.7-2.7 29.7-6.1v-34.6c-6 3.8-15.7 6.5-24.8 6.5-13.9 0-21.2-6.5-21.2-15.6s7.6-15.8 21.4-15.8c9.1 0 17.6 2.9 24.6 6.3v-36.4c-6-3.3-17.9-5.7-29-5.7-33.5 0-57.5 21.6-57.5 50.7zM347 39h-20v-30h-40v98h40v-36h20v36h41v-98h-41zM430 42h28v65h40v-65h28v-33h-96zM537 9h40v98h-40zM646.4 33.8l-19.6-24.8h-37.8v98h36v-48h.7l18 23.1 17.3-22.8v47.7h41v-98h-36.7zM755 70h24v-23h-24v-5h30v-33h-71v98h73v-31h-32zM865.1 55.2c-9.7-7.6-23.3-9.2-27.3-10.5-1.6-.5-3.1-1.4-3.1-3.4 0-1.5.9-3 4.8-3 5 0 17.6 2.3 29.6 8.7v-32.2c-9-4.6-22.9-7.8-34.9-7.8-24.9 0-40 13.5-40 33.2 0 9.5 3.6 15.9 8.8 20.5 10.1 8.8 23.8 10.3 28.6 11.6 1.8.4 3 1.2 3 3.1 0 1.6-1 3.3-5.1 3.3-5.8 0-19.4-3.1-32.4-11.7v33.5c10 5 24.5 8 36.9 8 25.8 0 41.1-13.2 41.1-32.1-.1-8.8-3.3-15.7-10-21.2z"/></symbol>
  </svg>

</body>
</html>
Now we are ready to use the logo to display it on our web page. To do this we will use another <svg> tag:
<svg><use xmlns:xlink="http://www.w3.org/1999/xlink" xlink:href="#logo"></use></svg>This puts our logo on the page; however, it is white on white so we cannot see it, so lets use CSS to modify it by applying some classes to the <svg> tag:
<style>
  .logo-dark {
    fill: #000;
  }

  .logo-large {
    width: 1000px;
  }
  </style>

  <svg class="logo-dark logo-large"><use xmlns:xlink="http://www.w3.org/1999/xlink" xlink:href="#logo"></use></svg>
Now we are ready to use the logo on our webpage and by applying CSS classes to the SVG link container we can use the logo in different areas within your website and have it sized and colored to fit the page.